How to Prevent an Autorun Virus from a USB Drive
 Have you ever had an infected computer you just got repaired, only to get it reinfected again soon after you got it back, and with the same infection? It doesn’t happen often with our customers, but it does happen nevertheless. Before you start wondering if the PC Technician who worked on your computer completely removed the infection or not, there are a couple things you need to consider first.
First, if you or whoever uses your computer engaged in the same activity that got your computer infected in the first place, there you go. Don’t go thinking that any protection that the PC Technician put on your computer is going to completely protect you from yourself.
Threats from Removable Media
Also, if you use USB Drives like a Flash Drive or a Portable Hard Drive, you could’ve reinfected your PC if they were infected with an autorun virus. Most people don’t drop off their USB Drives along with their infected computers, so they may be sitting at home or work just waiting for you to plug them in again so you can automatically resurrect and spread their evil viruses all over again.

Autorun viruses can immediately jump from drive to computer and vice-versa. So while your computer may have come home virus free, it could easily relapse into a full blown infection again if you insert an infected flash drive into your computer. So what can you do? How can you safely clean a USB drive if merely inserting is might infect the computer again? There are ways…
Security Software and Tweaks
Some security software will prompt you to scan removable drives upon insertion, and if it is infected, there is a good chance it will be detected and removed before anything bad happens. Once such program that I personally use is ESET Nod32 v5, or if you prefer the additional security of a Firewall and AntiSpam, get ESET Smart Security.
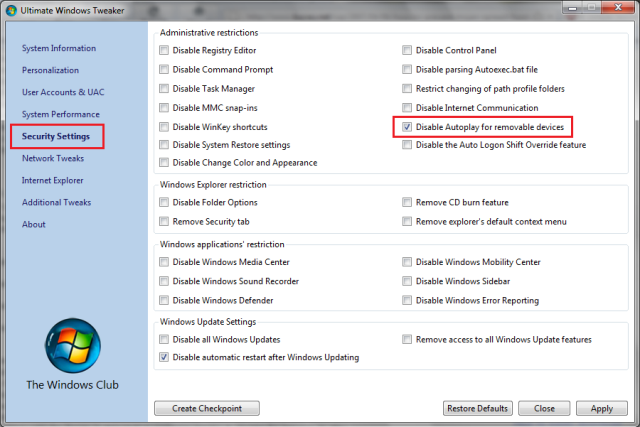
There is also a free portable program called the Ultimate Windows Tweaker that can help you to safely edit the registry and block removable drives from autoplaying. Then you can scan the drive for infections.
But if there is a legitimate program you need to run off your drive that normally autoplays, you can “Right-Click” the Drive Letter and Select “Explorer” to browse to it and run it manually. Once you are confident your computer and removable drives are clean, then you could let them autoplay the next time around. Below is a screenshot of the Ultimate Windows Tweaker.
 http://www.thewindowsclub.com/ultimate-windows-tweaker-v2-a-tweak-ui-for-windows-7-vista
I only mention the Ultimate Windows Tweaker because it also contains a wealth of other tweaks you could learn to use to customize or lock down your computer even more depending on your needs.
Caution: Please don’t change any settings unless you know what is does first and it fits your needs.
The Easy Way
I also wanted to leave you with the easiest method to temporarily disable the autoplay feature when inserting a removable drive. It is fallible though, because it depends on you to remember to do one simple thing.
Press and hold down the “Shift” key when inserting the USB Drive. This will prevent Windows from executing any commands in “autorun.inf” file, if present. So whether the “autorun.inf” file pointed to any malicious files or not, Windows will not execute any commands that may have been set to autoplay.
Any malicious files that may be sitting on your USB Drive will remain dormant as long as you don’t run them, giving you a chance to safely detect and remove them while they are sleeping. Just don’t forget to hold down the “Shift” key when inserting a questionable USB Drive into your computer.


Leave a Reply