Windows Troubleshooting – How to Boot to Safe Mode
What is the Safe Mode?
Safe mode is a troubleshooting option for Windows that starts your computer in a limited state. Startup programs don’t run in safe mode, and only the basic drivers and services needed to start Windows are installed. The words “Safe Mode” will appear in each corner of your monitor to identify which Windows mode you’re using. Because of the limited capability of Windows in the Safe Mode, you will notice some visual differences (lower screen resolution), and that some programs and peripherals do not work. Below is a list of device drivers and services that start in the Safe Mode (if installed).
Devices and Drivers that Start in Safe Mode
- Floppy Disk Drives (internal and USB)
- Internal CD-ROM Drives (ATA, SCSI)
- External CD-ROM Drives (USB)
- Internal DVD-ROM Drives (ATA, SCSI)
- External DVD-ROM Drives (USB)
- Internal Hard Disk Drives (ATA, SATA, SCSI)
- External Hard Disk Drives (USB)
- Keyboards (USB, PS/2, serial)
- Mice (USB, PS/2, serial)
- VGA Display Cards (PCI, AGP)
Windows Services that Start in Safe Mode
- Windows Event Log
- Plug and Play
- Remote Procedure Call (WPC)
- Cryptographic Services
- Windows Defender
- Windows Management Instrumentation (WMI)
Network-Related Devices and Services that Start in Safe Mode with Networking
- Network Adapters (Wired Ethernet and Wireless 802.11x)
- Dynamic Host Configuration Protocol (DHCP)
- DNS
- Network connections
- TCP/IP-NetBIOS Helper
- Windows Firewall
Safe mode is useful for troubleshooting problems with programs and drivers that might not start correctly or that might prevent Windows from starting correctly. If you have a problem in the normal mode that doesn’t happen in the Safe Mode, you can pretty much rule-out basic device drivers and services as possible causes. If you don’t know the cause of the problem, you can use the process of elimination to narrow down the problem. I would browse the Windows Event Viewer and Antivirus program logs to look for problems already recorded by your system. If you have had any Blue Screens, and you are an advanced user, you can perform a Crash Dump Analysis to read crash dump files created in the c:\Windows\Minidump folder. You can also try starting all of the programs you commonly use (one at-a-time), including the programs in your Startup folder, to see if a program might be the cause of the problem. Most programs should run fine in the Safe Mode unless it is corrupt, but there are exceptions. If your program requires any of the drivers or services that don’t start in the Safe Mode, it might not run, even if there aren’t any problems with it. But sometimes, Windows will tell you outright that the program you are trying to start won’t run in the Safe Mode.
If your computer automatically starts in Safe Mode without prompting, a problem with your computer might be preventing Windows from starting normally. If you suspect your computer is infected, the Safe Mode is the best mode for removing malware.
If you think the cause of the problem might be a recently installed program or device, try using System Restore to restore your system to a good “System Restore Point” just prior to the problem.
Starting Your Computer in Safe Mode
The video above shows you how to boot your computer into the Safe Mode using the F8 key at boot-up. While this video example uses Windows XP, the process is virtually the same for Vista and Windows 7 as well, only there will be some slight menu and visual differences.
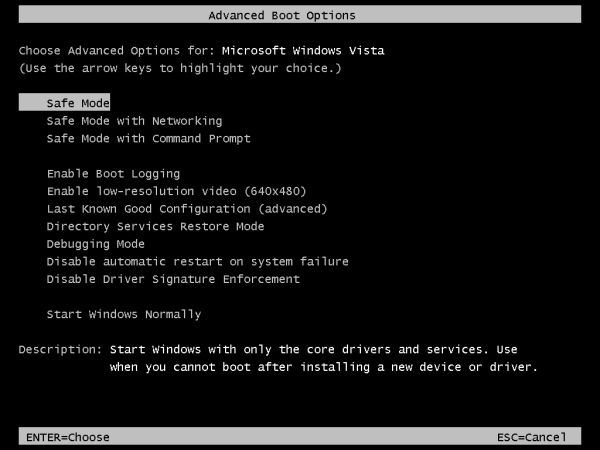
- You only have to press the F8 key once, but it must be pressed in between the diagnostics screen after power-up and the Windows logo screen. I would suggest that you press the F8 key about once a second until the Advanced Boot Options menu appears. Any more often than that might cause a keyboard error making your computer beep whenever you press a key.
- On the Advanced Boot Options menu, use the “Arrow” keys to select “Safe Mode” and press “Enter”.
- When the list of Operating Systems appears, you don’t have to do anything if you want the default Windows Operating System to load, but you can also use your “Arrow” keys again to manually select the desired Operating System and press “Enter”.
- When the Logon Screen appears, select a User account that has Administrator rights.
- Once your Desktop appears, you will see the words “Safe Mode” in each corner of your monitor.
- To exit the “Safe Mode”, either Shutdown your computer as usual, or restart your computer and let Windows start normally. Hopefully, you will have removed any issues that were preventing Windows from operating properly in the Normal mode.
- It may be necessary to boot-up to Safe Mode more than once to eliminate the problem.


4 Responses to “Windows Troubleshooting – How to Boot to Safe Mode”
[…] Windows Troubleshooting – How To Boot To Safe Mode | Spyware … […]
[…] See the original post: Windows Troubleshooting – How to Boot to Safe Mode | Spyware … […]
[…] Windows Troubleshooting – How to Boot to Safe Mode […]
[…] Windows Troubleshooting – How to Boot to Safe Mode | Spyware Prevention for Home and Small Bus… […]
Leave a Reply